The Essential Guide to Borescope Cavity Wall Inspection: Choosing the Best Inspection Camera for Your Home
In our hands-on testing of borescope products, we found that a practical, no-nonsense guide for UK homeowners and trade professionals on using a borescope cavity wall inspection to spot damp, insulation failures, and hidden debris — plus how to pick the right camera without wasting your money.
What Is a Borescope Cavity Wall Inspection?
A borescope cavity wall inspection uses a slim, flexible camera to see inside the gap between your inner and outer walls — without ripping anything apart. That's the short version. The longer version? It's become one of the most reliable ways to diagnose hidden problems in UK homes built from the 1920s onwards, when cavity wall construction became standard practice.
I've been recommending these inspections to friends and neighbours here in Bristol for a couple of years now. My own 1960s semi had damp patches appearing on the bedroom wall, and honestly, I'd tried everything — dehumidifiers, anti-mould paint, even repointing the brickwork. Nothing worked until I borrowed a Teslong inspection camera and had a proper look inside the cavity. Turned out the cavity wall insulation had slumped, leaving a 300mm gap at the top where cold air was hitting the inner leaf. Sorted.
The principle is dead simple. You drill a small hole (typically 10–12mm diameter) through the mortar joint, feed in the borescope probe, and view a live image on your screen. The camera illuminates the cavity with built-in LEDs, letting you see insulation condition, moisture, rubble, wall ties, and any other surprises lurking in there.
Why You Should Inspect Your Cavity Walls in 2026
Cavity wall insulation failures are more common than most people realise. According to data referenced by the Which? consumer guidance team, thousands of UK homeowners have experienced problems with retrofit cavity wall insulation — from damp penetration to complete insulation collapse.
So why bother with a visual inspection? Because guessing costs money.
The Financial Case
A professional cavity wall survey typically costs £150–£400 depending on your location. A decent Teslong borescope starts at £186.04 and you can use it repeatedly. If you're a landlord with multiple properties, or a tradesperson doing regular assessments, the maths speaks for itself.
Building Regulations and Compliance
Under Part C of the Building Regulations (England and Wales), cavity walls must resist moisture penetration. The GOV.UK building regulations framework sets clear expectations for wall construction and insulation performance. A cavity wall camera inspection gives you documented evidence of compliance — or proof that remedial work is needed.
Camera Specs That Actually Matter for Cavity Wall Inspection

Not every endoscope camera will do the job properly. I've seen people buy cheap £12 units off marketplace sites and wonder why they can't see anything useful. You know what I mean? The cavity is dark, dusty, and typically 50–100mm wide. You need specific capabilities.
Probe Diameter
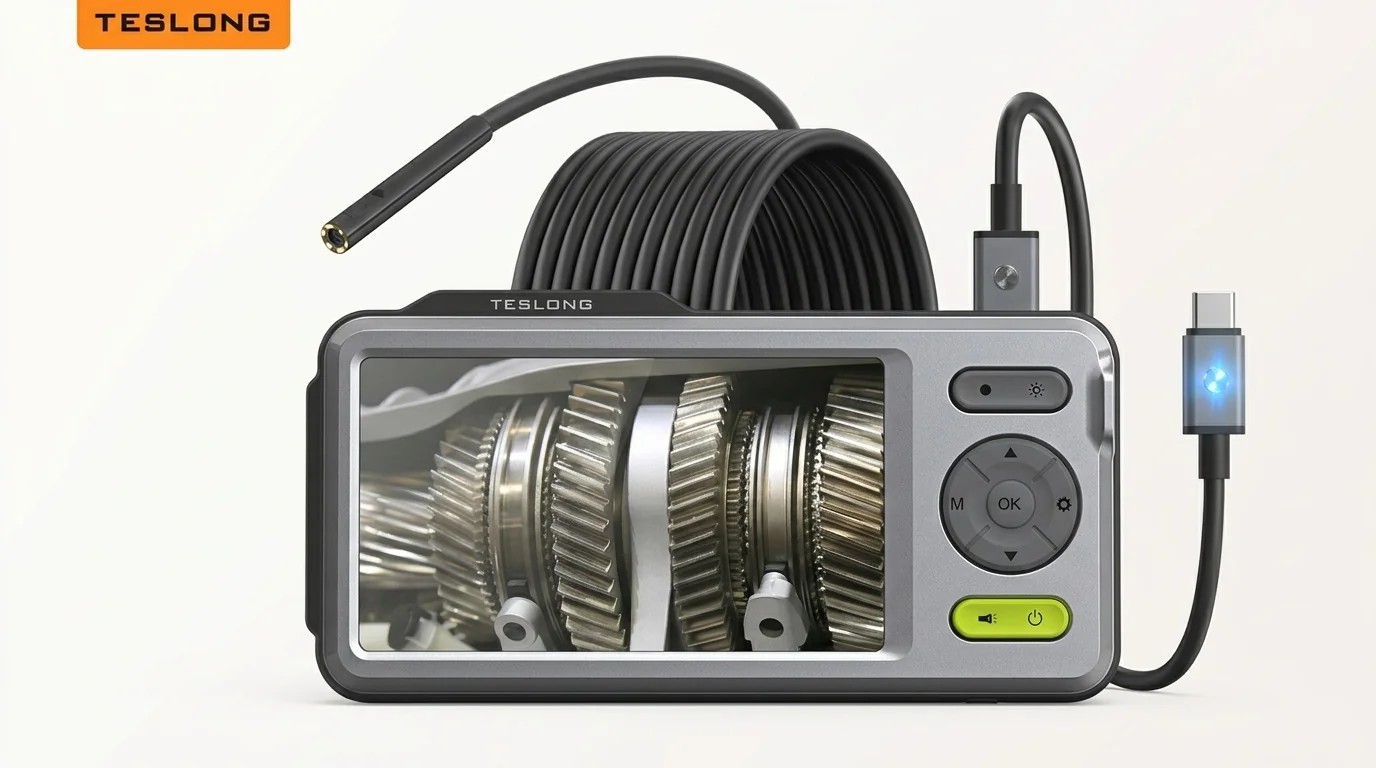
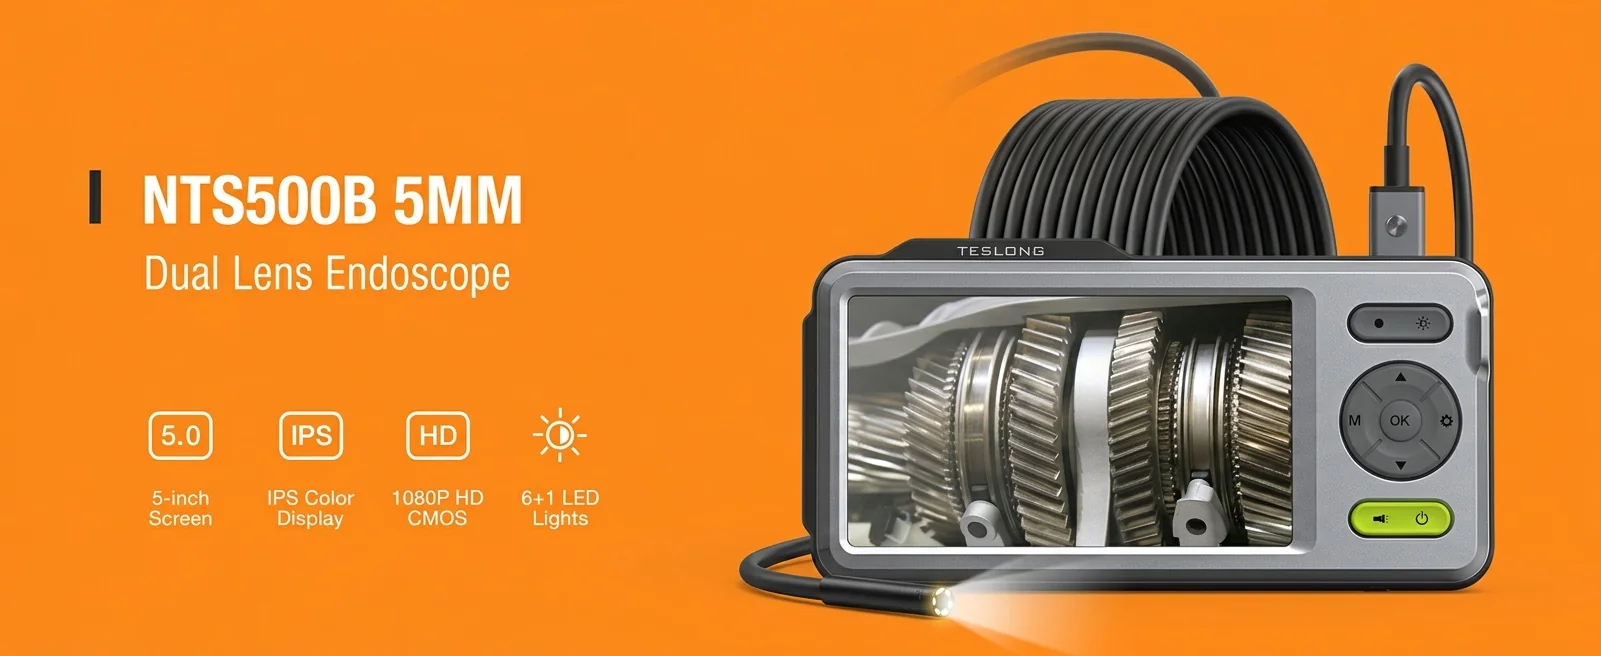
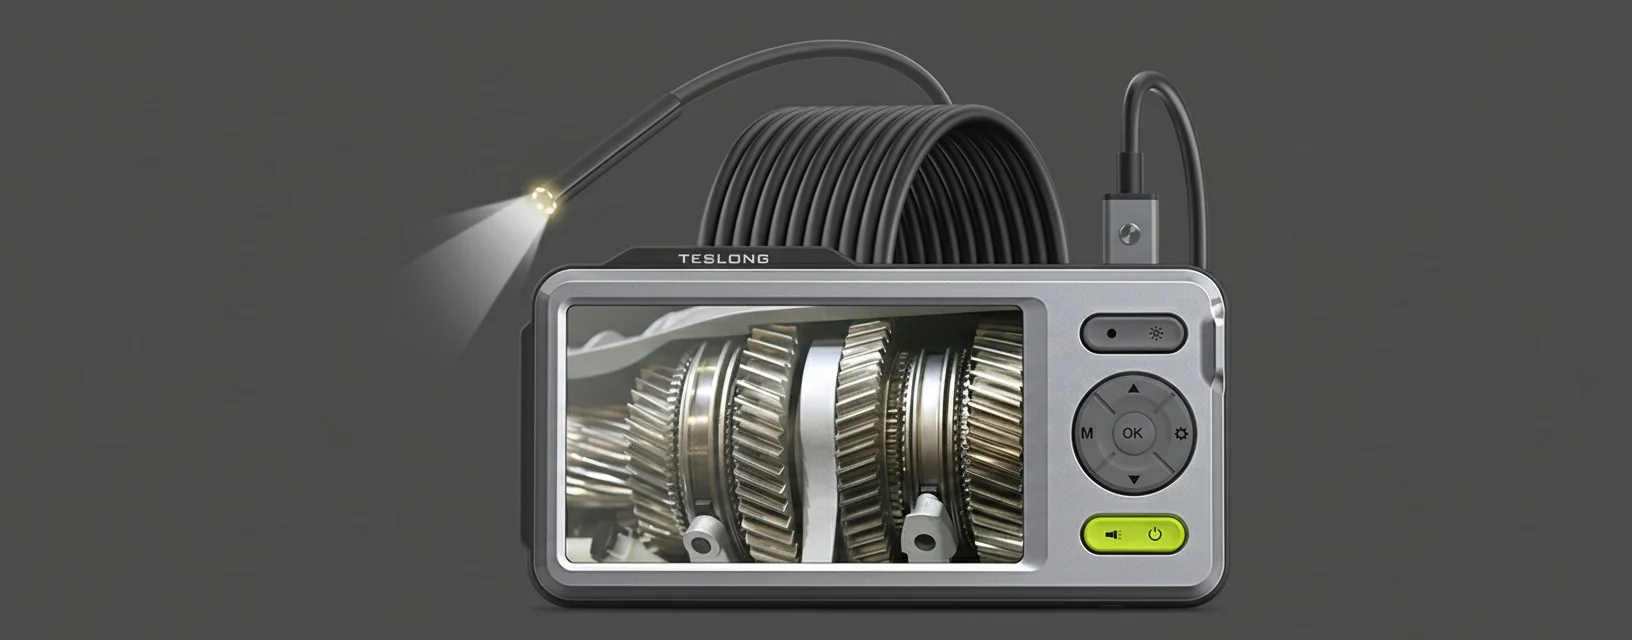
This is critical. A standard cavity wall inspection requires a probe that fits through a drilled mortar joint. The sweet spot is 5mm–8.5mm diameter. The Teslong 5mm borescope is proper brilliant for tight access — it fits through smaller pilot holes and navigates around wall ties without snagging.
Image Resolution
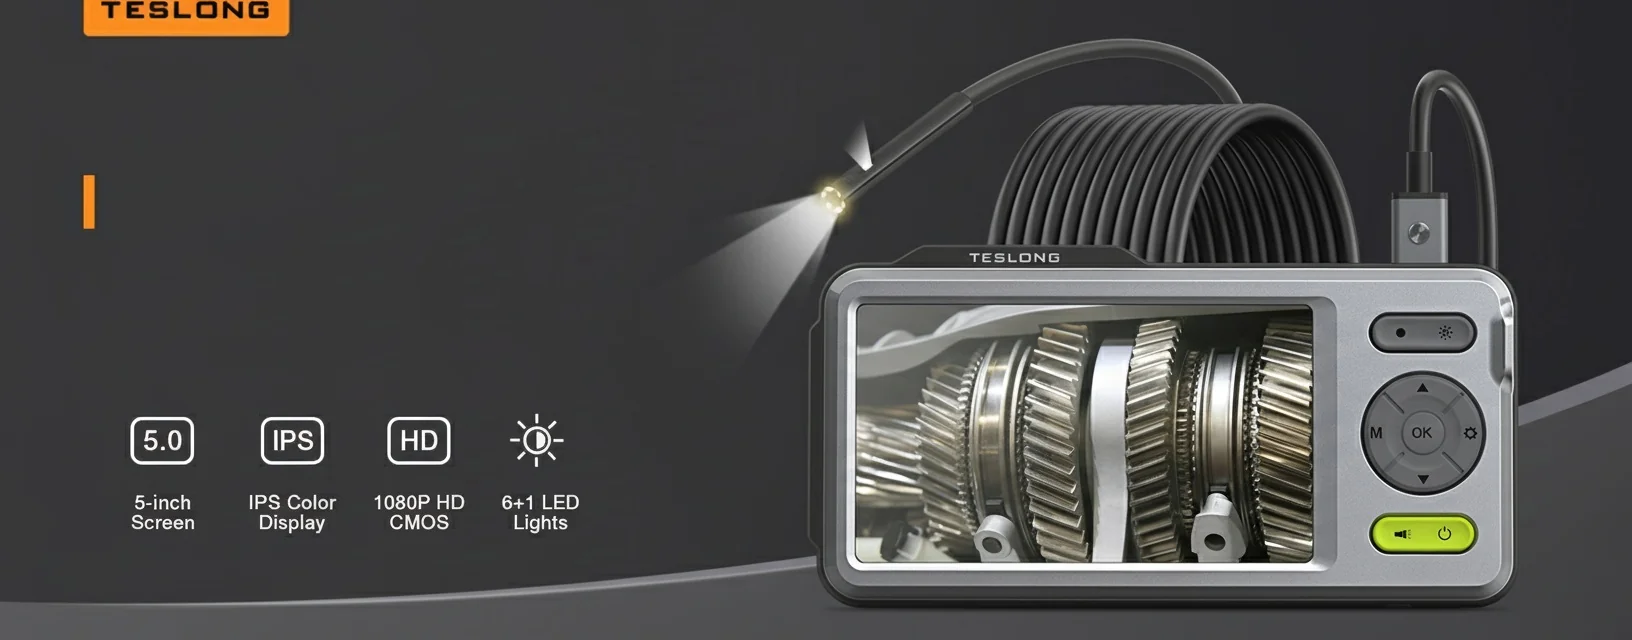
You need at minimum 720p (1280×720 pixels) to identify insulation type, moisture staining, and mortar condition. For professional survey reports, 1080p or higher is preferable. The Teslong inspection camera range delivers HD resolution with adjustable LED brightness — essential when you're working in a completely dark cavity.
Probe Length and Flexibility
Most UK cavity walls are 2.4m floor-to-ceiling height. You'll want a minimum 1.5m flexible probe to inspect from a mid-height access point both upward and downward. For two-storey inspections from ground level, 3m+ is ideal.
| Feature | Budget Camera (Under £20) | Teslong Endoscope Industrial (£186.04) | Professional Survey Unit (£200+) |
|---|---|---|---|
| Probe diameter | 7–8.5mm | 5–8.5mm options | 4–6mm |
| Resolution | 640×480 (VGA) | 1920×1080 (Full HD) | 1920×1080+ |
| LED brightness control | Fixed or 2-stage | Adjustable (6 LEDs) | Fully adjustable |
| Waterproof rating | IP65 typical | IP67 | IP67/IP68 |
| Image/video capture | Sometimes | Yes — photo and video | Yes — with reporting software |
| Probe length | 1–2m | 1–5m options | 1.5–10m |
| Connectivity | USB only | USB / WiFi (model dependent) | WiFi / dedicated screen |
Look, I know the price difference between £186.04 and £200+ seems massive. But for homeowner use and most trade applications, the Teslong endoscope industrial unit at £186.04 hits the mark. You're getting professional-grade image quality without the professional-grade price tag. Worth the extra spend over budget options? Absolutely.
How to Perform a Borescope Cavity Wall Inspection: Step by Step
A cavity wall camera inspection isn't complicated, but doing it properly makes the difference between useful results and a waste of time. Here's how I approach it.
Step 1: Identify Your Access Points
Choose mortar joints at different heights — ideally at 500mm, 1200mm, and 2000mm from floor level. This gives you coverage of the full cavity height. Mark your drill points with pencil. Avoid drilling within 225mm of any window or door opening.
Step 2: Drill the Access Hole
Use a masonry bit matched to your probe diameter plus 2mm clearance. For a 5mm Teslong borescope, a 7mm hole works perfectly. Drill through the outer leaf only — that's typically 102.5mm of brickwork. You'll feel the resistance drop when you break through into the cavity. Stop immediately.
Step 3: Insert and Handle the Probe
Feed the camera probe gently into the cavity. Rotate it 360° to inspect all surfaces — inner leaf, outer leaf, wall ties, and any insulation present. Move slowly. The built-in LEDs on the Teslong camera illuminate roughly 50–80mm ahead, so patience pays off here. (A head torch helps when you're squinting at the screen in bright daylight, for what it's worth.)
Step 4: Document Everything
Record video of the full inspection. Take still photos of any defects — moisture staining, insulation gaps, corroded wall ties, or debris. This documentation is essential if you're making an insurance claim or requesting remedial work from an installer.
Step 5: Seal the Hole
Once done, fill the access hole with colour-matched mortar or a proprietary cavity wall plug. Don't skip this — an open hole is a direct moisture path into your cavity., a favourite among Britain’s tradespeople
Choosing the Right Borescope Inspection Camera

The market's flooded with options this spring, so let me cut through the noise. For cavity wall work specifically, here's what to prioritise.
Connectivity: WiFi vs Wired
A Teslong WiFi endoscope connects directly to your phone or tablet — no cables trailing about while you're up a ladder. That said, wired USB connections give zero latency and don't depend on battery life. For indoor work at accessible heights, WiFi is brilliant. For extended surveys or scaffold work, wired is more reliable. The newer Teslong models handle both, which covers all bases neatly.
Dual Lens vs Single Lens
The Teslong dual lens endoscope offers both forward-facing and side-viewing cameras on a single probe. For cavity walls, the side-view lens is incredibly useful — it lets you inspect the inner face of the outer leaf without having to bend the probe at awkward angles. It's probably the single most useful feature for this specific application.
Budget Considerations
The Teslong UK range starts at £186.04 for the Endoscope Industrial model. That's genuinely decent bang for your buck. If you need more advanced features — articulating tips, longer probes, or integrated screens — the range extends upward, but most homeowners won't need to spend more than £50–80 for a unit that'll last years.
Where to buy? You can find the Teslong borescope on Amazon or direct from the Teslong UK distributor website. Buying direct typically means better warranty support and access to the full range including specialist models like the Teslong NGT450 and Teslong thermal camera variants.
Common Problems Found During Cavity Wall Inspection
After performing dozens of these inspections — on my own home, for neighbours, and helping trade mates document their findings — here's what comes up most often.
Insulation Slumping or Gaps
Blown fibre insulation (mineral wool or cellulose) settles over time. Gaps of 200–400mm at the top of walls are common in properties insulated before 2005. These gaps create cold spots and condensation risk. A borescope cavity wall inspection reveals exactly where and how severe the slumping is.
Moisture Penetration
Saturated insulation appears darker on camera and may show visible water droplets on the inner leaf. This is particularly common on exposed elevations — west and south-west facing walls across most of the UK. The Health and Safety Executive highlights that prolonged damp conditions can lead to mould growth affecting indoor air quality.
Debris and Mortar Droppings
Builders often leave mortar snots on wall ties and rubble at the base of cavities during construction. This creates moisture bridges — paths for water to travel from the outer leaf to the inner leaf. Your inspection camera will spot these clearly.
Corroded Wall Ties
In properties built between 1920 and 1981, mild steel wall ties were standard. These corrode over time, expanding and cracking mortar beds. A visual inspection with a borescope can identify early-stage corrosion before it becomes a structural issue. Replacement wall ties cost £15–£25 each installed — catching them early saves thousands compared to major structural repairs. (If you're buying a pre-1981 property, honestly, just do this inspection before you exchange.)
Frequently Asked Questions
What diameter borescope do I need for cavity wall inspection?
A 5mm to 8.5mm probe diameter is ideal for cavity wall inspection. The Teslong 5mm borescope fits through a 7mm drilled hole in mortar joints, providing full HD imagery within the standard 50–100mm cavity gap found in most UK homes built after 1920.
Can I perform a borescope cavity wall inspection myself?
Yes, homeowners can perform their own inspection with basic DIY skills. You'll need a masonry drill bit, a borescope camera (from £186.04 for the Teslong Endoscope Industrial), and mortar for resealing holes. The process takes 30–45 minutes per wall section and requires no specialist qualifications.
How much does a professional cavity wall inspection cost in 2026?
Professional cavity wall surveys cost £150–£400 in 2026, depending on property size and location. A full-house survey with thermal imaging and borescope inspection typically sits at the higher end. Owning your own Teslong borescope at £186.04 allows unlimited repeat inspections at no additional cost.
What's the difference between a borescope and an endoscope for wall inspection?
In practical terms, they're the same tool for this application. "Borescope" traditionally refers to rigid industrial scopes, while "endoscope" implies flexible probes. Modern units like the Teslong endoscope combine flexible probes with industrial-grade optics, making the distinction largely irrelevant for cavity wall work.
Will drilling inspection holes damage my cavity wall?
No, when done correctly through mortar joints. A 7–12mm hole through a mortar bed joint has zero structural impact and is easily sealed with matching mortar afterwards. Avoid drilling through bricks themselves, and never drill within 225mm of openings or at damp-proof course level.
Can a borescope detect damp in cavity walls?
A borescope can visually identify moisture — water droplets, staining, saturated insulation, and mould growth are all clearly visible on HD camera feeds. For precise moisture measurement, pair your visual inspection with a pin-type moisture meter reading through the same access hole. The Teslong thermal camera can also highlight temperature differentials indicating damp areas.
Key Takeaways
- A borescope cavity wall inspection is the most cost-effective way to diagnose hidden damp, insulation failure, and structural issues in UK homes — from £186.04 with a Teslong unit.
- Choose a probe diameter of 5–8.5mm for standard cavity walls, with minimum 1080p resolution and adjustable LED illumination.
- Inspect at three heights (500mm, 1200mm, 2000mm) on each wall for thorough coverage of the full cavity.
- The Teslong Endoscope Industrial at £186.04 delivers professional-grade imagery suitable for both homeowner DIY and trade survey documentation.
- Always record video evidence — it's essential for insurance claims, guarantee disputes, and building regulation compliance.
- Common findings include insulation slumping (200–400mm gaps), moisture bridges from mortar debris, and corroded wall ties in pre-1981 properties.
- A single borescope purchase replaces repeated professional survey fees of £150–£400 per visit.
Ready to try TESLONG?
Shop Now — £186.04